We’re making some changes to SharePoint Online pages
MC118086
Plan For Change
Published On : September 14, 2017
We’re making some changes to SharePoint Online pages running the classic user experience. We’re changing the default document mode of all classic pages to be Edge mode, instead of Internet Explorer (IE) 10 mode. This change does not apply to sites that are using custom theming, or sites that have the modern list experience disabled at the site or tenant level. This change will begin rolling out Tuesday, October 1, and will complete by the end of October.
How does this affect me?
For most users, this change will just increase performance and reliability of pages. However, some custom master pages or custom web parts may contain custom code that takes a dependency on the older IE10 document mode. This change only affects the document mode of SharePoint pages. It does not require that users switch their browser from Internet Explorer to Edge.
What do I need to do the prepare for this change?
If you have sites with this kind of customization, the sites can be reverted to use the IE10 document mode by doing the following:
1. Open the site in SharePoint Designer.
2. Edit the master page that is in use.
3. Find this line:< SharePoint:IECompatibleMetaTag runat=”server” /> And replace it with:< meta http-equiv=”X-UA-Compatible” content=”IE=10″/>
4. Save the page and reload the site.
Please click Additional Information to learn more about document mode changes.
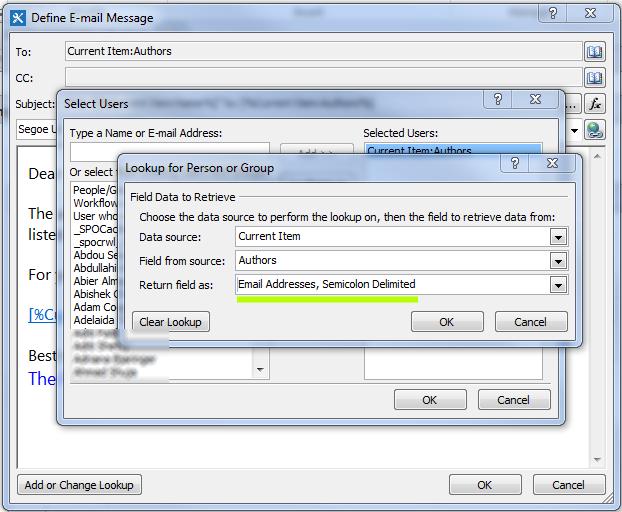
I created two 2010 workflows using SPD 2013. One sends emails and the other changes permissions and they both operate on multiple people who are specified in a multi-select person field in SharePoint. Turns out, the way you specify the return values is different for each scenario (but not how you think).
Send Email Workflow Action … return values from multi-select as “Email Addresses, Semicolon Delimited”. Works fine for this action.
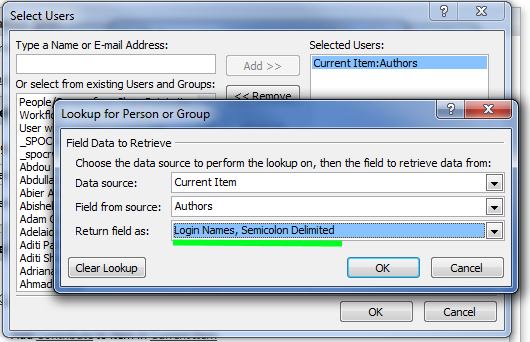
Replace permissions on an item … for this action, returning a multi-select as “Email Addresses, Semicolon Delimited” didn’t work. I changed the return value to “Login Names, Semicolon Delimited” and it appeared to work. (BTW … none of this is documented in the product help or in online documentation for the product, so it’s trial and error all the way). I thought this made sense as setting permissions may be more related to login names than email addresses … BUT NOT SO FAST …
… it only worked when a just one single person was entered into the form field. When multiple persons are entered into a multi-select field, the workflow would crash. What is up?
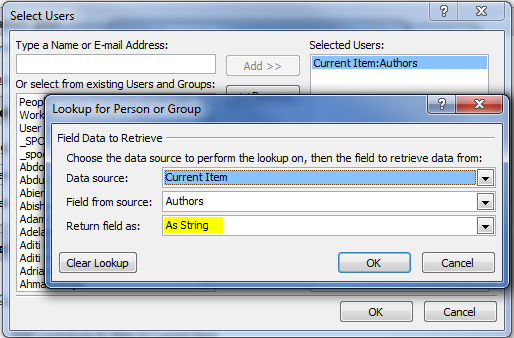
After some further Googling, and trying various suggestions that didn’t work, I found that someone had gotten around this by setting the Return field as STRING! This suggestion worked! I’m sure there’s a reason, but it’s not very intuitive, to say the least. Not sure why it works, but it does.
Might be worth a try if you need to set permissions using a multi-select person field.
One thing you may need to address when migrating from an onsite version of SharePoint to Office 365 is how to handle “orphaned users”.
An orphaned user is one that is referenced in a SharePoint list or library in the onsite SharePoint environment, but who is not active in Azure Active Directory in Office 365. When migrating content, documents and items that contain references to an orphaned user cannot be migrated because when the content is added to Office 365, it fails field validation because the user is not active in the cloud AD.
It’s a pretty common situation and we recently encountered it again with a client that we were migrating to Office 365. Some migration tools like ShareGate provide mechanisms to work around the orphan situation. These mechanisms are easy to use and greatly help in mitigating the migration content with references to orphans, but don’t result in a “full-fidelity” migration of the original content. However, with ShareGate’s help, we recently figured out a new approach that results in a clean migration of content with no loss of user data.
Before we describe the OOB mechanisms and the new approach we came up with, let’s review a typical scenario that results in orphaned users:
Imagine Acme is a company that has onsite (on-premise) SharePoint, Exchange, and Active Directory. Let’s say there’s a user named Bob Smith with login of ACME\bsmith and email of bsmith@acme.com . Over time, Bob logs in and uploads documents and creates list items. Other people may also create list items that contain a “person” field and add Bob as a valid value in one of those list items. Then, Bob leaves to pursue other opportunities. After Bob leaves, Acme, like most companies, disables Bob’s AD account so that he can’t log in anymore. They typically do that for some amount of time and then eventually delete the account. So far, so good.
Some time later, Acme decides to migrate SharePoint and Exchange to Office 365. To start, Acme decides on DirSync to keep their onprem and cloud Active Directory synchronized. Once DirSync is up and running, Acme attempts to migrate content from onprem to the cloud but any document or list that contains a reference to Bob fails to copy over cleanly. Yup … Bob’s an orphan!
Obviously, for mid-size or larger companies with a normal amount of employee “churn” and have been using Exchange and SharePoint for years, the number of orphaned users continues to grow and grow over time and can be a surprisingly large number relative to current employee population. And consequently, the amount of content that can be affected by orphaned users can also be surprisingly large.
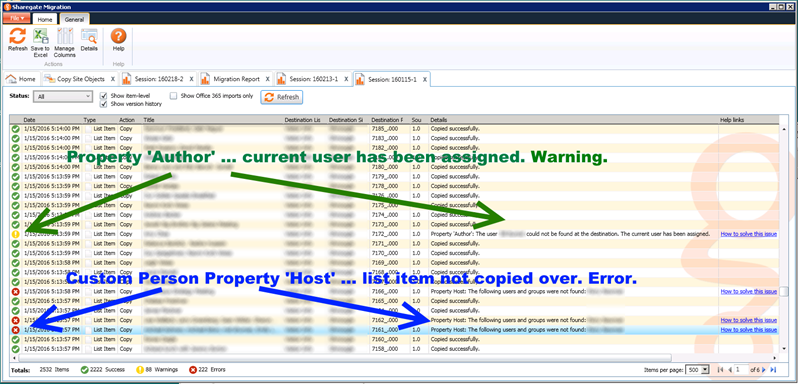
When migrating content using ShareGate, depending on the type of field in which an orphaned user is found, you may encounter one of the following responses:
Notice the difference in how the above fields are treated (btw, some of what happens is configurable, but this is default behavior). The list item with the orphaned Author property actually migrates but gives a warning because ShareGate replaced the Author field with the ID of the current user (this is a default action for this type of property). On the other hand, the custom person property called Host caused that list item not to be migrated over at all. Instead this scenario gives an error. One of the things I like about ShareGate is the quality of the documentation and how it’s integrated throughout the product. When you get an error or warning, ShareGate provides a link to the specific help page for that error.
The above help page provides 2 possible solutions to the orphaned user issue:
SET A DEFAULT VALUE … Through the ShareGate UI you can set a default value (which can be a blank, or a valid user). When ShareGate finds an orphan while migrating content, it replaced the orphan with the default. Of course, doing this results in the loss of the original data in that field. To help preserve the data, you can create an extra column in the target list (a plain text field) and copy the name or email of the orphan into the text field. Because it’s a text field, it doesn’t need to validate the orphan against Active Directory. This is great for some situations, but it does require you to modify the target list to capture orphan data. And now you have two fields to search in for the same logical data element.
MAP USERS AND GROUPS … ShareGate provides the ability to set up user and group maps that make it easy to replace one user with another. This provides a finer level of granularity and enables you to set specific replacements for specific users (or groups). This also is great for some scenarios, but still results in the loss of the original user data in its original context.
While both of the above solutions are viable for getting the documents and list items migrated, they require a change of data and/or structure during the migration, so this is not what I would call a “full-fidelity” solution.
Another Option
Since the problem with orphans (actually, the definition of orphans) is that they don’t exist in the target environment, I wondered if we could just temporarily add the orphans to AAD for the duration of the migration. After contacting ShareGate and they confirmed that in theory it should work, I did some initial testing and a couple false starts, it worked! All the data came through intact in its original context with no mapping required and no loss of data.
Here are the high level steps we used:
Run the ShareGate Orphaned Users report and export the results to Excel.
Modify the report to conform with the input format for Bulk Adding Users into Azure Active Directory.
First Row should be these headers (this line might wrap, but it’s all on one line … headers are tab separated): User Name First Name Last Name Name Job Title Department Office Number Office Phone Mobile Phone Fax Address City State or Province ZIP or Postal Code Country or Region
Only the first 4 fields are required to create the users:
User Name is the person’s email address, e.g. bsmith@acme.com (note … this field doesn’t come back from the ShareGate orphan report, so you’ll have to find a way to add the email addresses into the CSV file. If your company has a standard format for email addresses, you can often automate most of it with a script or Excel formula that creates the email from manipulating first and last names. It’s not perfect, but it can save you a lot of work.
First Name, Last Name, and Name are just normal text.
Bulk add the orphans to AAD:
Don’t assign them an Office 365 license. They don’t need a license … they just need to be in AAD.
Don’t send the users a notification email (remember, they’re no longer employees).
Make sure they are in an active (unblocked) state.
Handle blocked users in AAD. Some orphans may fail to get added because they are actually already in AAD, but in a blocked state. (In our scenario, these were users who may have left the company more recently and were disabled in onprem AD but not yet deleted).
Locate the orphans in this state.
Reset their password and don’t send them the email notification (again, these are ex-employees).
Unblock these orphans.
Run the migration.
Remove temporary accounts. Using the orphan list as a source document, delete and/or re-block the AAD accounts.
PowerShell can be used to delete the users.
Also, note that for this to work, the user values don’t need to be an active user account in the source AD … it can be disabled or even non-existent. The core requirement, is to have an Active AND ALSO UNBLOCKED account on the target O365 tenant … just for the duration of the migration. And also they don’t need to be assigned an O365 license. They just have to be there during migration and then they can be re-blocked (or deleted) afterwards.
Using this technique, we were able to migrate all the content to Office 365 with full fidelity and not losing any data or context in the process.
When designing, building, implementing, and supporting business systems, most modern project management styles and methodologies seem to fall into two main styles: waterfall (traditional) and agile (modern). The contrasts in these two styles seem to run remarkably parallel to the similarities and differences between classical music (traditional) and jazz (relatively modern).
Most of us have probably worked on projects where everything and everyone just seems to click, and also other projects that, in spite of everyone’s best efforts, just don’t click at all. It’s an awesome feeling when the team is “firing on all cylinders”, but when the wheels of progress are grinding or even completely jammed, it’s totally the opposite experience: team members can become frustrated, communication can falter, precious time can be wasted, quality can suffer, and all of these can negatively impact the most important success criterion on any project … client satisfaction.
The selection of a project management approach has an outsized impact on any given project’s chances for success because it’s the framework on which the project is built. The selected approach is also often the basis for a statement of work (SOW), so how the project is structured can also become a legal commitment. So it’s important to structure it well. And just like different kinds of music and necessarily good or bad, it’s not that any one methodology is inherently better than the others, but rather how well the chosen approach fits the realities of the project (or performance at hand).
So let’s take a quick look at some VERY BASIC classical and jazz music concepts and see how they relate to project management. I don’t believe you’ll need to be a musician to appreciate the metaphor, but it probably wouldn’t hurt to at least have a general interest in music.
Disclaimer: This post isn’t meant to be an academically rigorous work from either the musical or the project management side. I just wanted to share a musical metaphor that I’ve used for years in the hopes that it might help illustrate some project management dynamics that can affect a project and all too often fly under the radar. Enjoy!
Classical Approach
In general, classical music is extremely well-defined in advance. This approach to music scales easily from small groups to large orchestras because everything is defined in advance in complete detail. For example, here’s a typical page of classical music … it’s the first page of Edward Elgar’s Serenade for String Orchestra (Opus 20):
Like a typical waterfall project plan, each instrument (resource) has its own slot on the overall timeline which is read left to right and wraps to the next line when it runs out of space. Vertical lines represent a repeating time interval, and notes that appear above each other are intended to happen at the same time.
If you want to hear what the above sounds like, here is a video of the above Serenade for String Orchestra. Interestingly, because of the level of detail in classical music, the above page of music only covers the first 27 seconds of the video! (Similarly, waterfall projects typically have more documentation to support the detailed definitions that need to be completed before building can begin).
OK, now compare this simple waterfall project example to the classical sheet music above:
Notice the similarities in a classical score and a typical waterfall project plan? They are both on a timeline. They both define what precisely should be performed, which resource (or musician) will do it, when they will do it, for how long, which tasks/musical notes will happen simultaneously, and in what order from start to finish. As with classical music, traditional waterfall methodologies provide a more structured and linear approach where each phase is clearly defined and completed before the next phase can begin.
Jazz Approach
Although it uses the same notes and instruments as classical music, one major difference with jazz is that it deliberately does not define everything up front. The jazz methodology is to provide the essential outline of a piece of music and rely on the band members’ experience and expertise to build on that outline and create the finished product in real time. For example, here’s a page of jazz music notation for the song Autumn Leaves by Johnny Mercer (indicative of their purpose of enabling exploration and improvisation, written jazz music for a single song is often referred to as a “chart”):
Like the classical sheet music above, there are notes and vertical timeline markers. But this time, you don’t see separate notes for each instrument. There’s only a single line of notes that defines the melody. No other supporting notes are specified. Instead, on the same timeline, there are letters (e.g. A-7, D7, etc) that indicate the chord (i.e. other notes played simultaneously) that goes with the melody at that point in time. There are a countless ways to play each chord and rhythms with which to play them, and this notation doesn’t specify any of it. All of the band members, including piano, bass, drums, sax, trumpet, etc. know from experience and knowledge which specific notes to play and which ones sound best in the context of the current moment.
Like agile project management, jazz often has built-in iteration. Very often, a jazz song starts with the band playing the original song melody once or twice. Then, the song repeats with one or more musicians taking turns improvising (“soloing”) while iterating on the same song structure. Finally, the band plays the song’s original melody one last time to end the song. Often the number of iterations is also not pre-defined but continues until the song feels done to everyone’s satisfaction. During the performance, jazz musicians listen intently to each other, takes cues from one another, and support each other as they both define and create music in real time. Success is defined solely by the quality of the actual outcome.
Here are two versions of Autumn Leaves. Although it’s the “same song” there are huge stylistic differences such as the specific instruments in the band and the precise selection of notes and rhythms. It’s also interesting that one is about twice as long as the other. This is due to the number of song iterations that the musicians decided to perform. That wouldn’t happen in classical music. But it’s totally normal and encouraged in jazz.
Like jazz, agile development methodologies like Scrum, Kanban, and iterative project methodologies like RUP all address the need to create and adapt “on the fly” while providing a clear framework that supports the kind of rapid progress that depends on skill, feedback and interaction. Two characteristics that agile approaches share are iteration and concurrent design and development. This RUP diagram shows this dynamic in action. Notice that as time goes by there are iterations (I1, E1, E2, C1, C2, etc.) and that modeling, requirement, analysis & design, Implementation, testing and deployment are all happening concurrently during each iteration.
Although there are differences among them, agile methodologies in general all provide a high level framework that enables the active participation and creativity of all roles simultaneously. Focus is intensely on the current iteration. The specific features to include in the current iteration and how they are built are determined by real time interaction of all players.
Waterfall vs. Iterative
Key Factors
Here are some factors that can influence the selection and efficacy of a project management approach for a given project (or musical performance):
Design … The more that details need to be designed and approved up front before construction can begin, the more it’s likely to be a better fit for a waterfall/classical project. If a project requires real-time team, cross-team creativity and interactivity then lean towards an agile/jazz approach.
Size … In general, the bigger the project, the more likely it’s a candidate for a waterfall/classical approach. (There’s a reason why symphony orchestras don’t just “jam” … they plan it out and write it down).
Iterations … If the client wants to release new functionality incrementally, then an agile/jazz approach is likely a better fit. It’s also possible to build some iteration into a waterfall project, but iteration is a given for most agile/jazz approaches.
Hybrid … If different project phases have different scales, then you may be able to treat them differently to good effect. For example, designing and developing a software feature can be done agile, while rolling that software out to 5000 users across 8 time zones can be done waterfall.
Culture … For a variety of possible reasons, some company cultures are simply more comfortable with either waterfall or agile methodologies. Sometimes their preference is a requirement, but it’s always worthy of consideration.
It seems that project management “fit” comes directly from the combination of the above realities and the requirements of the project at hand. If the project is ripe for an agile approach, and you impose a waterfall management style, you not only create more work for yourself, but more importantly, you may actually impede the team’s ability to design and build, which can result in a ding on timing, quality and morale. Conversely, choosing an agile approach when the project has strong waterfall indications can also kill team effectiveness and cohesion when the required controls and explicit task definitions and timelines that are required by the realities “on the ground” are not there.
Human Factors
Somehow, even for non-musicians, it seems fairly easy to understand that some people can play classical music beautifully while being totally unable to improvise on a popular tune and vice versa, or that some people can “play by ear” while others only “read music”. It’s almost intuitive that while there are commonalities, the types of creativity and specific skills are different in classical music and improvisational jazz. However, the fact that there are differences in people’s ability and comfort level with waterfall or agile project methodologies seems to be less easily appreciated or understood.
Individual affinity for a particular project management style may be a matter of “nature” as when some people just seem to have a “knack” for one thing but not another (e.g. analytical ability, creativity, introvert/extrovert, etc.). Other differences may be based more on “nurture”, or experienced-based, and develop as a result of a person’s early project experiences (both positive and negative).
There is an old, but interesting pop-psychology book called The Corporate Steeplechase whose author claimed to have “explored the business lives of 5000 Americans over a period of 25 years to identify the personality traits that lead to their success or failure at work.” To summarize his findings … people who joined a large, established company “right out of school” learned to value things like not going outside the job description, respecting the hierarchy, and the importance of work/life balance. Those people whose first job was with a small, entrepreneurial company learned to value different skills like thinking outside the box, doing more with less, wearing many hats, challenging assumptions, etc. Then, when these people changed jobs, they would invariably have difficulty in transitioning whether they moved from a large company to a small entrepreneurial one or vice versa. This sometimes even resulted in full-blown career crises when skills and methods that worked in the prior company not only didn’t work in the new environment, but were actually seen as dysfunctional, destructive and uncooperative by other team members.
So similarly, people who have previously participated in successful waterfall or agile projects may be molded by their experience and learn to value and develop skills that are essential in one context but detrimental in the other.
Next Steps
Regardless of the specific methodology or tools you choose for your projects, having a deeper appreciation for the qualitative differences between agile/jazz and waterfall/classical can help project managers and team members alike.
As a manager, the more you start to notice this jazz vs. classical dimension in project management, the better you may be able to craft a plan that fits the project at hand. You may also develop a better feel for how much detail to put into the plan, and when and what not to plan.
And with a deeper understanding of the people side of the equation, you may be better able to help team members bridge the gap in their perceptions and understanding of the project and their role on the team … for example, sometimes helping jazz players to provide a little extra structure or encouraging a classical player to build in some time for experimentation.
Good luck with your future projects (or performances). And please let me know if any of this “resonates” with you!
A client was recently looking for options to improve on SharePoint’s OOB ability to display pictures. One way to do this is to use jQuery and SharePoint’s REST API to connect a Picture Library to one of several jQuery gallery libraries that generally provide lots of display options (most of them are responsive as well which is very cool in this cloud-first, mobile-first world).
I did the following example using an image gallery plug-in called UniteGallery (http://unitegallery.net), but a similar approach of dynamically getting the images from a SharePoint REST query should work with other gallery/lightboxes as well. (For example, this one also looks promising but I haven’t had a chance to try it yet: http://andreknieriem.de/simple-lightbox/ ).
Picture Library Basics
Picture Libraries in SharePoint 2013 and SharePoint Online (Office 365) make it easy to drag and drop pictures into the library where they then can be tagged with metadata, sorted, filtered, versioned, etc. SharePoint Picture Libraries also provide some basic views of images including list views, and thumbnail views, and a basic slideshow capability. To improve performance of SharePoint own UI components, SharePoint automatically creates a thumbnail and a midsize version for each uploaded picture and uses those in their UI.
Also for performance reasons, most of the image lightbox and gallery plug-ins I found had the option to specify a separate thumbnail file to render in the gallery view. Of course, this requires that separate, thumbnail-sized images have been created for each picture. Doing it manually would be an extra amount of work for each image but the result is better performance. If we take advantage of the automatically generated thumbnails that SharePoint generates, we can improve performance without adding any extra work for the person uploading the pictures.
[BTW, the FTG URL’s in this article are not publicly accessible … just meant to illustrate a real world example running in a typical O365 environment].
After uploading an image (or maybe during the upload?), SharePoint generates the additional thumbnail and midsize images. The thumbnails go in a subfolder named ‘_t’ that’s located directly under the picture library. The midsized images go in their own sub-folder called ‘_w’ (also a direct child folder of the picture library).
Since the thumbnails and midsize images are stored in separate folders they can each be named the same, which is how SharePoint in fact does it. The filename is constructed by taking the picture’s original file name without the extension, followed by an underscore, followed by the original file extension, followed by .jpg as shown here:
I uploaded both JPG and PNG files and the thumbnails and midsize images generated for both of them were in the JPG format. So SharePoint appears to generate JPG images regardless of initial image type. For example, if you start with a .PNG file called Sample.png, the auto generated thumbnails and midsize images would be JPG images called Sample_PNG.jpg.
If you need to handle images files with 4-character extensions (e.g. JPEG) you’ll need to add a little extra logic to the javascript below to test for that case. As an example, a image named Image01.JPEG would be named Image01_JPEG.jpg after conversion. (I bumped into this once but eliminated that test to focus the code on getting the images and feeding them to UniteGallery).
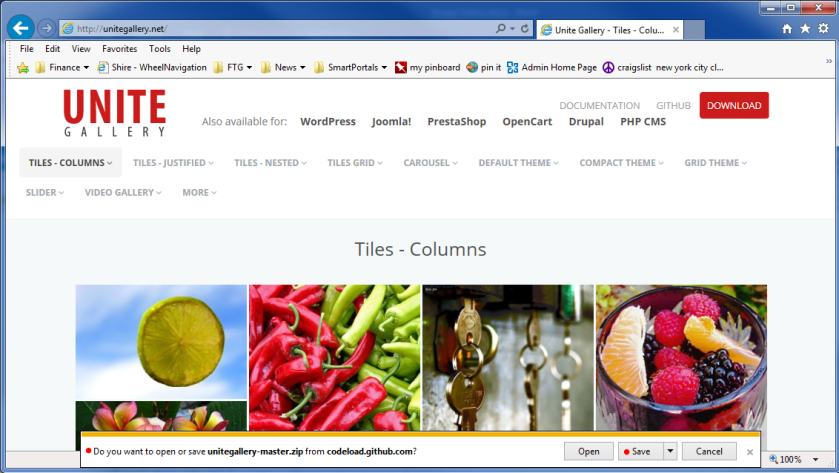
I used the free version of UniteGallery in this article, and they have a ton of paid “themes” that can style a gallery every which way. From their home page, you can display a test gallery in a variey of styles.
Start by clicking on the red DOWNLOAD button to get the unitegallery-master.zip file:
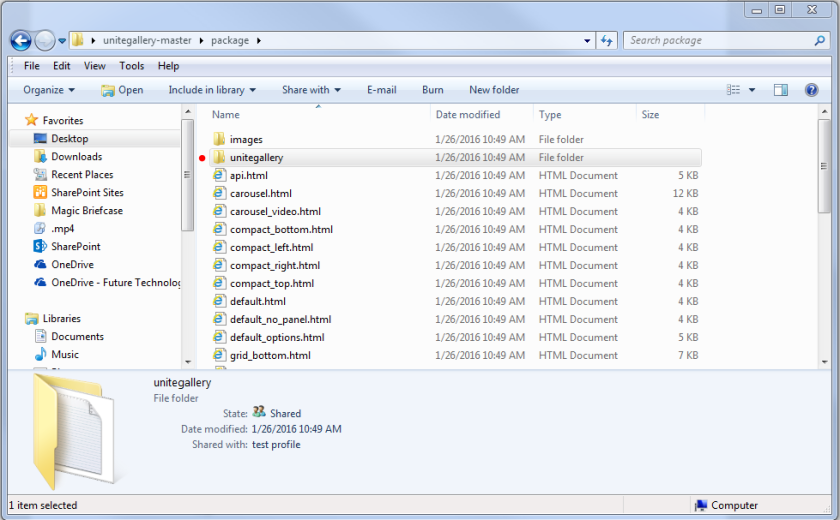
Unzip the contents and upload the folder united-master\package\unitegallery to your SharePoint site (in this article, I’m putting unitegallery in a document library called Scripts).
In addition to the unitegallery folder, the ‘package’ folder also contains several .html files which each show one of the style samples that are shown on the UniteGallery home page. I liked the way that the “Tiles – Justified” example looks, so I reviewed the sample file to see what was required in the markup for each image. (We’ll need to recreate this markup using jQuery).
Here’s a relevant excerpt from “tiles_justified.html”:
So we can see that each image in the above tiles-justified example is basically an anchor tag with optional properties that surrounds an image tag. I wanted to find the minimum that was required in the img tag and after some experimentation found that you could get away with a hashtag for the href and an empty string for the alt tag. I also found that I could eliminate the description entirely. You’ll need to add these back in if you want to support some of the more advanced features in UniteGallery, e.g. sliding image name and description.
So unlike the above example file in which the gallery and image DIV’s are hardwired in the HTML, the approach we’ll take is to create an empty gallery div and use jQuery and SharePoint REST API to grab the images and thumbnails from the image library to populate the gallery div. Once the div is created, then call the unitegallery function to do it’s magic and we’re done. Here’s the script I used (of course, you’ll need to replace https://futuretechnologygroup.sharepoint.com and make other changes to match your environment):
ImageGallery.txt
<script type='text/javascript' src="https://ajax.googleapis.com/ajax/libs/jquery/1.11.3/jquery.min.js"></script>
<script type='text/javascript' src='/scripts/unitegallery/js/unitegallery.min.js'></script>
	<link rel='stylesheet' href='/scripts/unitegallery/css/unite-gallery.css' type='text/css' />
<script type='text/javascript' src='/scripts/unitegallery/themes/tiles/ug-theme-tiles.js'></script>


<div id="gallery" style="display:none;"></div>


<script type="text/javascript">

$(document).ready(function() {

 //use the getJSON method of Jquery
 $.getJSON("/intranet/_vti_bin/listdata.svc/Photos",function(data) {

  //iterate through all returned list items, i.e. images, and add them to the gallery div:

  $.each(data.d.results, function(i,result) {

   //get basic item properties
   var Name = result.Name;  // this is the image filename, with the extension.
   var Path = result.Path;  // this the the site collection relative path to the image (minus the image name).

   // extract relevant image filename sections
   var ShortName = Name.slice(0,-4);    // image filename without the extension (we need this to build the url to the SharePoint-generated thumbnail.
   var ImageExt = Name.substr(Name.length - 3); // image file extension, also used in building thumbnail url.

   // construct url's to image and thumbnail
   var ImageBig = '' + Path + '/' + Name;  // url to the full image.
   var ImageThumb = '' + Path + '/_w/'  + ShortName + '_' + ImageExt + '.jpg'; // url to image thumbnail.

   // construct element to add to the gallery div.  this output designed to feed the tiles theme of unitegallery. adjust this to suit your gallery of choice.
   var ImageStructure = '<a href="#"><img alt="" src="' + ImageThumb + '" data-image="' + ImageBig + '" style="display:none"></a>';

   $("#gallery").append(ImageStructure);  // add this image element to the gallery div.

  });

  $("#gallery").unitegallery({  // invoke the unitegallery function, passing array of options.
   gallery_theme: "tiles",
   tiles_type: "justified"
  });

 });

});

</script>
Adding The Gallery To A Page
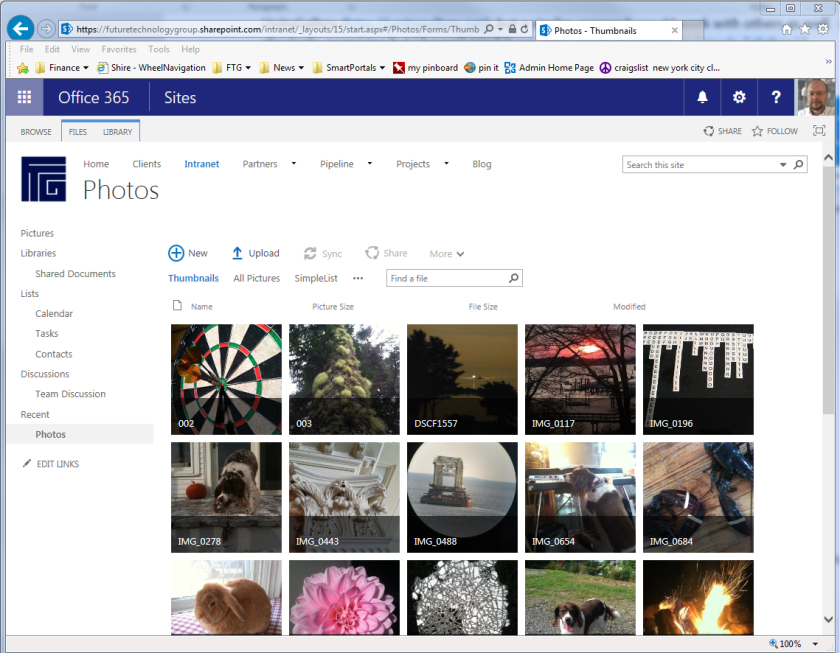
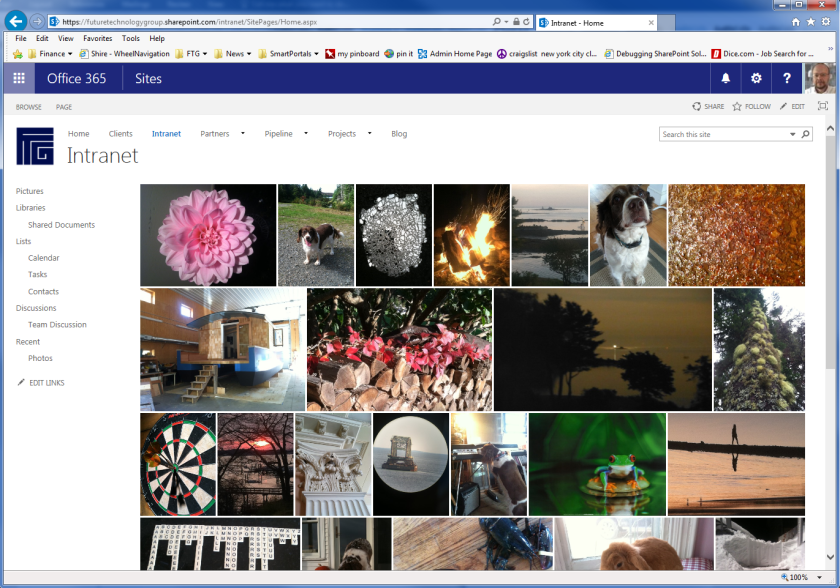
Once you’re done adjusting the URL’s in the text file above, save it to the Scripts library (or wherever you want). Then add a Content Editor Web Part to a page and reference the script file as the source. After saving the web part settings, the image library is displayed like so:
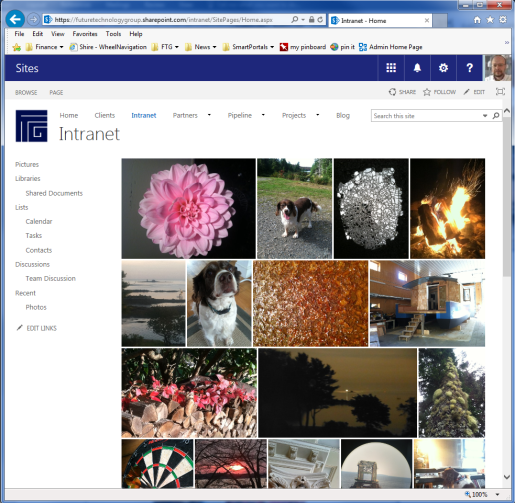
Unite Gallery is responsive so that if you shrink the browser window it dynamically resizes and repositions the images like so:
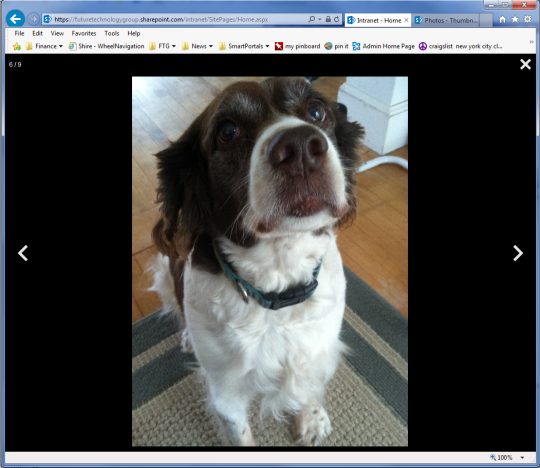
And when you click on an image it shows it in a full browser overlay with next/prev arrows:
And that’s it! Now you can display the images in your Picture Library in a customizable, responsive, gallery and lightbox. Pretty good for a half page of code … gotta love jQuery and REST!
In the 15 years that I’ve been helping companies use SharePoint, I’ve noticed that the Managed Metadata service is very often overlooked.Most of the time, people think they’ll get to it later and by the time they do address it, they already have a ton of content that hasn’t been tagged. And that’s a shame because it’s so easy to set up and manage and adds so much value to all the content that you keep in SharePoint.
. . .
[Pardon the interruption! … I decided to try out Sway in Office 365 to see how it works as a blogging platform. Please continue reading here and let me know what you think. Thanks!]
So it’s been several months since Microsoft announced their new “cloud-first, mobile first” push and with it the concept of intelligent, next-gen portals. Since then they’ve rolled out some really cool tools like Sway, Delve, Videos, PowerBI that we can use as point solutions or integrate into so many different custom apps and solution contexts. So far so good! But then, just as I was starting to feel really good about all of these developments … along comes Office 365 Groups and I must say, at first they really started to bum me out!Continue reading “Office 365 Groups: The Duck-Billed Platypus of Collaboration Tools”
Although I do love “magical” thinking, the new NextGen portals, Groups, and Delve don’t eliminate the need for a strong SharePoint architecture in Office 365. At least at this point in time, that kind of thinking is not just magical … it’s also wishful!
Everybody knows that good foundations are important for houses, but did you know they are also critical in Office 365? Without a unifying architecture, the best you can achieve in O365 is a collection of point solutions. Perhaps not surprisingly, the biggest part of building that foundation has nothing to do with technology.
As you probably know, the biggest factor in using technology in business is not the technology itself. It’s people! And the same is true of the level of success you can achieve with Office 365. For example, you can’t have a unified approach to using Office 365 if you don’t have a unified vision in fixed in the minds of your people. Continue reading “SMB’s: 10 Steps for Creating a Unified Foundation in Office 365”
In 2011, Google’s cloud apps were in full swing and in fact it was Google’s success in the cloud at that time that helped Microsoft find its own brand of “cloud religion”. The year 2011 marked the beginning of a distinct (some would say artificially induced) cloud surge that continues to this day. Continue reading “Ex-centric Cloud Migrations”


